2016-01-21

Relay Siphon - Theory and Practice

I have done some additional experiments with the relay siphon, and am pleased with the results.  Using a 1/2" diameter control siphon, I was able to start the main siphon in a very short period of time.

Here are some numbers:

Relay Siphon Test
1" drain, 3/4" main standpipe, 1/2" control standpipe
Fill Rate0.01449275362in/sec
time to 1/2" spillover195sec
height at 1/2" spillover5.326086957inches
volume at spillover13257.96562cm3
main siphon start time14seconds
main drain time17seconds
main drain rate779.8803306cm3 / sec


Most of these numbers are approximates, since the timer is human-operated and the measurements are not exact.  What we can be certain of is that the relay does actually work.  The 1/2" spillover height is the water level where the 1/2" control standpipe begins experiencing water flow.  The siphon start time is the time between when the control siphon starts and the main siphon starts - that is, the control siphon operated for 14 seconds before the main siphon began to pull water down.  From the time the main siphon operated to the time it finished was 17 seconds.  Note that during this time, the control siphon had lowered the water level as well, but by only a very small amount.

Here's a picture of one of the other relay tests:

The presence of the trap does not necessarily help nor hurt the control siphon.  It does cause air to be trapped in the control bell, so the water level does rise quite a bit higher than without the trap.  The above picture shows the 1/2" control (left) feeding into the 3/4" tee from the main (right), into a 90 and down a 3/4" drain pipe.  The drain rate on this setup seemed slower than the 1" drain pipe, but unfortunately I didn't have time to pull any timing numbers.  But again, this test was primarily about the function of the relay.

To ensure the water level was slow enough not to trip the 3/4" standpipe, I capped the control pipe and let the water rise.  As expected, there was insufficient flow and insufficient back-pressure to trigger the 3/4" siphon.  Uncapping the 1/2" standpipe caused a flood of water into the drain, which then triggered the main siphon, thus demonstrating that sufficient flow from the control was all that was necessary to induce the main siphon.

Replacing the bell on the control siphon allowed it to function as designed: by starting its siphon at sufficient water height, and providing sufficient flow via siphon-action alone to trigger the main siphon.  I was able to watch the main siphon start using my snorkel bell (described in an earlier post).  It would start several seconds after the control started full siphoning.

While a single large main siphon will certainly draw water out of a grow-bed quickly, I could see this mechanism also finding use in long grow-beds where the risk of poor circulation may be significant.  You should, in theory, be able to tee-in a number of main siphons and have them trigger off of one control.  Once one of the main siphons starts, the flow should be great enough to start any remaining main siphons that did not start from the control flow alone.  I'd like to experiment with this in the future.

All this fast draining potential has me asking another question, however - one that I don't readily see much information on in the literature I've read to-date: how long should plant roots be exposed to water before the grow-bed is drained (or air after it has drained)?  If it takes an half hour to fill the bed, and 60 seconds to drain it, the roots may be exposed to air for at least 15 minutes before the water level is high enough to touch their tips.  I'm hoping there is other literature out there, especially among the hydroponics community, that addresses this.  The closest thing I think I've seen to a number is with the timer-based flood-and-drain systems: 15 minutes of fill time, 45 minutes of drain-and-empty time.

More work to do!

2016-01-18

Two-stage (Relay) Bell Siphons

I was considering today how to deal with the flow-rate problem for siphon-start, when an idea struck me.  I suspect someone has thought of this before, but a short web search didn't turn up anything fruitful.  There is one fellow I know of that does something similar: he has multiple large grow-beds on a slope, and synchronizes their draining using a 55-gallon drum.  There's a video on YouTube about it.

How about for smaller grow operations?  Let's suppose you have a fairly large grow bed.  First problem: the bed will fill very slowly, so the rate of height-gain of the water may not be sufficient to trip a large-diameter siphon.  Second problem: you want the bed to drain quickly, so you need a large diameter siphon.

The theory of operation is similar to that of a relay: we use a small current to trigger a large current.

The image to the right shows two siphons feeding into the same drain.  The smaller siphon (green) is the control siphon.  The larger (red) is the main siphon. The operation is simple: the control siphon trips quickly, thanks to its small diameter, and starts a rapid flow of water through the drain pipe.  This flow creates a vacuum that pulls water up into the main siphon, thus starting it.  Once the main siphon starts, both siphons will operate until water has been drawn down to the highest intake hole - or down to the bottom of the snorkel tube, if so equipped.

Note that the drawing I have here is not to scale, nor is this configuration of pipes necessarily a good one.  I also did not test the configuration in the drawing.  I did, however, test something very similar:

Two-stage, or relay, bell siphon test
The image shows my test apparatus, with some peculiar plumbing.  The drain for the bell siphon (inside the tank) runs into a 90, which then heads into a tee fitting. The tee sports the control tube (from the top), and a drain out the bottom.  The drain is further fitted with another 90 and some extra pipe, to provide back-pressure.  I was able to start the siphon without the extra 90 and pipe, but it required a high rate of flow through the control.

To test, I filled the tank with water up to the 6" mark.  The main standpipe is 8" tall.  The bell was then placed on top of the standpipe.  I used a hose-to-slip fitting to attach the garden hose to the control pipe.  I was then able to control the rate of flow through the control pipe at the spigot.  With a very low flow rate, the siphon tripped after about 10 or so seconds, which I suspect to be the time it required to pull sufficient vacuum on the main siphon.

The pipes in the image above are a mix of 3/4" and 1", only because I had no 3/4" tees available.  Ideally, the control pipe should be smaller than the main pipe, and of a consistent diameter.  The low rate of flow I was able to use on the control pipe suggests that were the control itself a bell siphon, it would very readily trip the main siphon into action, since a bell siphon would generate a significantly greater rate of flow.  As an added bonus, having two siphons in operation at the same time should produce faster drain rates as well.  And with sufficiently high drain rate, we may avoid the siphon-stop problem.

I would ensure the main standpipe rises 1/2" above the control standpipe, so that there is no chance of the main pipe leaching water and prohibiting the siphon from starting.  It would be good not to go too high, though, since the vacuum generated by the control pipe may not be great enough to pull the water more than 1 or 2 inches up into the main siphon's bell.  I'd like to test this further, using a single bucket, some 1/2" pipe for the control, and upwards of 2" pipe for the main.  2" is probably overkill, but it would be nice to know it works.

One other possibility is to have the control standpipe and the main standpipe together in the same bell (pictured at right).  This would require a large diameter bell, but it would also allow you to use a single snorkel to break the siphon - if so desired.  It would require two bulkhead fittings in close proximity.

Again, the pipes in my drawings and on my test assembly are not ideal; there are probably many configurations possible that would achieve the same effect.

One last note:  it may also be possible - but is, as of yet, unconfirmed - that the control pipe need not necessarily be housed inside a bell.  Once the main siphon starts, the operation of the system reverses: instead of the control pipe pulling vacuum on the main pipe, the main pipe instead pulls vacuum on the control.  So long as the main siphon assembly is operating properly, it ought to be possible to have the control open to the air without losing siphon.  All things being equal, however, I think I'd prefer housing the control be in a bell for the reasons stated above.

Siphon Testing - Round 2, Brief Findings

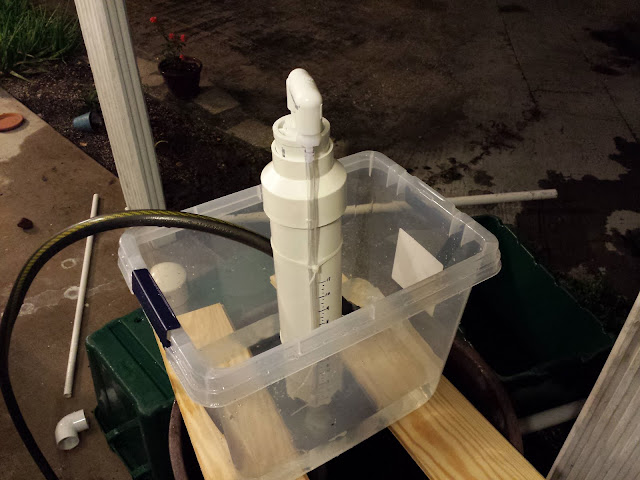
The standpipe and funnel assembly
I ran several tests on my experimental siphon, trying different diameter drain pipes and different lengths.  I also tested slow-fill, to determine whether or not the standpipe funnel actually helps.

Effects Drain Pipe Diameter and Length on Drain Times


The standpipe is 3/4" in diameter.  I ran several tests with various configurations (with and without snorkel, with and without the standpipe funnel).  Unfortunately I could only run one or two tests per series, so please take these results with a grain of salt...

As you can see on the chart above, the 3/4" drain pipe length appears to affect drain times fairly predictably.  Unfortunately the drain rate increases were not as high as I was hoping them to be.  The first test (left-most dot) is without any additional drain pipe.  The X axis is pipe length, the Y axis is the seconds to drain - that is, the time from siphon-start to the siphon-end burp.

The fastest drain time was recorded while testing without the funnel in place.  I only ran one test of that sort, however, so that result might be an outlier.  I noticed that in only one or two tests the drain rate would be extremely fast, but in the remainder of tests it seemed to hold fairly constant.

For the next series of tests, I used a bushing to convert to 1" after the bulkhead fitting.   The idea for this was to reduce static pressure and allow the water to flow faster.  Thus, 1" drain pipe would be used.  As this was larger than 3/4", technically it would have operated at slightly higher pressure.
The majority of the 30" tests were done with a snorkel bell.  The snorkel was used primarily to watch the pressure inside the bell.  The most important things to note here are that the drain rate remained constant for most of the tests, between 35 and 40 seconds for nearly every test, and seemingly regardless of drain length.  Again, in the chart above, the X axis is for length, the Y axis for drain time (in seconds).

I would hypothesize, based on these data, that the ideal solution is to maintain a constant pipe diameter throughout the bell siphon.

The snorkel test bell assembly.


Bell Water Level Observations

My snorkel bell rises quite high above the top of the standpipe.  The siphon had no problem starting, given sufficient flow - more on that later.  The interesting thing I noticed was that after the siphon started, the water level in the snorkel rose by at least 1", usually 2", and in the case of using 3/4" drain pipe it rose by over 4"!  This level would usually slowly drop as the water level in the source reservoir was depleted.  The informal relation seemed to be: the faster the siphon, the higher the level reading on the snorkel.

Compared to the 1" drain pipe, the 3/4" drain pipe appeared to deliver significantly more suction once siphoning began.  I had marked my bell with inch indicators up to 11", but the water level in the snorkel tube quickly shot above where the 12" would have been.  All 1" pipe tests delivered consistent results: snorkel level rose by about 1.5" from the top of the standpipe, and drain times were consistent.

It was also interesting to watch the water level shoot up once the siphon started in earnest, and to drop as it was breaking.   I was able to observe the transition from spillover to drain with ease.  Another interesting test would be to verify if the water level in the snorkel matches that inside the bell.

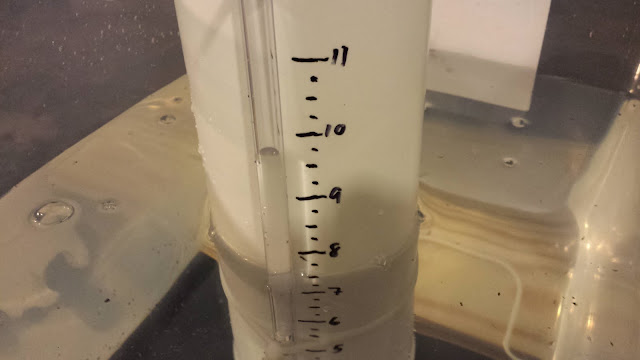
Siphon in action: Note that the level of the tank is around 7.5", whereas the water level in the siphon appears to be nearly 10"

Slow Fill Observations

For the slow-fill tests, I rigged the supply to provide approximately 0.0358 cubic centimeters per second of water.  This figure was calculated based on observing the rise of the water in the tank and calculating it against the estimated tank geometry.  The drain was left at 30" of 3/4" pipe for all the tests.  I used the standard bell for all but the final test.

I first observed the standpipe without the bell, to ensure that the rate would not quickly flood the standpipe.  Having observed this, I replaced the bell and waited to see if the siphon would start.  It did not.  I then added the funnel back onto the standpipe.  The water seemed to flood into the standpipe a little bit better, but the rate was still much too slow to trigger a full siphon.

I added one 90-degree bend to the bottom of the standpipe, but it had no effect.  I added a second 90-degree, and finally it achieved siphon.  I repeated this test without the funnel, and came up with generally the same results.

Slow Fill Conclusions

Fill rate is key for siphon start.  I hypothesize that the fill rate must overcome the non-siphon drain rate in order to build a solid column of water in the pipe.  One the water column has been established, the siphon will start.

If the fill rate cannot be altered, then adding fittings to create back-pressure also works.  I did not use a trap-style drain configuration, as I prefer to let the bell breathe while the tank fills.  I am also not yet convinced that the trap is superior to simply two downward-trending bends.  The two 90-degree bends - added back-to-back to the very end of the drain - added sufficient back-pressure in my experiments.  They also did not immediately appear to harm siphon drain rates.

We must realize that the siphon is a dynamic system and governed by flow rates.  As such, the addition of snorkels, bends, reducers, etc, to "fine tune" the siphon will work only so long as the flow rates are appropriate.  In other words, these things do not guarantee a better (or even a functional) siphon.  You are, in effect, simply moving numbers around.

The standpipe funnel also does not necessarily yield a better siphon, though I suspect it did allow the siphon to trip faster, moving from spillover to drain much quicker than with the straight, unadorned standpipe.  This is, after all, the reason people claim to employ a funnel on their standpipes.

In future experiments, I would like to examine the rates of inflow and outflow, to understand better how the addition of back-pressure solves siphon-start problems.  I would also be curious to see if the drain pipe length has an effect on siphon-start; in all my slow-start tests, I kept the drain pipe length constant.  Finally, it would be interesting to see if the water level inside the bell is an indicator of the rate of drain.

In no cases did the 1/8" emergency drain hole in the standpipe inhibit siphon operation or tank fill.  

All Drain Test Results

Below are the results from all the tests.  The last two columns are the calculated cubic centimeters per second of drain rate, and the calculated time it should have taken for draining to complete.  As can be seen, the wide variability in the results suggest further testing.  The 1" tests are also curious, in that they were extremely consistent and always significantly longer than the calculated times.  I suspect the reason for this is the 3/4" standpipe, and/or the bushing to go from 3/4" to 1" pipe.  I plan on performing additional tests using 1" standpipe, once I have a 1" bulkhead fitting.


3/4" Diameter Drain Pipe Tests
Test #lengthdrain time (seconds)calc cm3/scalc t
1044n/an/a
21126665.9329.90401379
328211,062.4618.74333258
91321723.9427.50769186
107.526531.2337.48666515
1130191,099.7518.10777959
1630221,099.7518.10777959
17 - no funnel30151,099.7518.10777959
1" Diameter Drain Pipe Tests
Test #lengthdrain time (seconds)calc cm3/scalc t
4644874.3522.77575217
512401,236.5216.10488881
6a30201,955.1110.18562602
6b30411,955.1110.18562602
7a - snorkel12361,236.5216.10488881
7b - snorkel12361,236.5216.10488881
7c - snorkel12361,236.5216.10488881
7d - snorkel12351,236.5216.10488881
8635874.3522.77575217

2016-01-15

My Trial System Design and Project Plan

Very soon after I had devoured the book Aquaponic Gardening: A Step-By-Step Guide to Raising Vegetables and Fish Together, by Sylvia Bernstein (ISBN # 978-0865717015), I set out to draft my first system.  Here's a peek:

The trial system configuration

Goals

My goals for this system:
  • Keep it small, but large enough so that we can stabilize the system and keep it running for at least one whole season.
  • Minimal investment in structure - let's not build a huge greenhouse before we know we can actually make this work.
  • Use a nutrient solution transport scheme that has had high reported success and minimal impact on the fish.
  • Make the framing components extremely easy and cheap to build (the picture above is not accurate to the final specs)
  • Large plumbing for minimal cleaning.
  • Keep the pump accessible.
  • Design for maintenance.
  • Design to mitigate failures and fish-death.
  • Design for future expansion.

System Design - Overview

To achieve these goals, I have set out to do the following:
Plumbing View - Grow bed assembly removed for clarity
  • The system is a 200 gallon cone-bottom fish tank, a 100 gallon sump, and two 50 gallon grow-beds.  This technically gives me a 1:2 ratio of fish tank to grow-bed space, where the preferred ratio is 1:1 or 2:1.  I can compensate by simply not adding as many fish.
  • By putting this on my back porch, I have an enclosed space that I can manage and is convenient for monitoring and upkeep.  No structure builds required.  The downside is that I need to supply auxiliary lighting, which means either buying or building lights.
  • I toyed around with CHOP-1 and CHOP-2, and finally settled on CHOP-1.  While I'm not convinced of the problems that detractors of CHOP-2 go on about, CHOP-1 plumbing is easier by far.
  • The framing components for the grow-beds will be made of 2x4 lumber.  All the cuts are straight (again, ignore the portions of the picture where this does not appear to be the case, that was an early draft).  Assembly can take place with screws and carriage bolts, the latter for the most significant load-bearing members to add rigidity and strength.
  • I will have to double-check the size of the NPT fitting on the bottom of the fish tank, but I believe it's 2".  I plan to run the largest diameter reasonable from the fish tank to the grow-beds, to ensure good flow and minimal clogging.
  • All the plumbing should be sufficiently accessible.  Space is a bit cramped, but I have positioned the system components such that nothing is completely inaccessible.
  • All plumbing will be valve-governed.  The under-tank plumbing will probably be glued wherever slip fittings are used.  This is to mitigate a pressure disaster.  Not visible in the picture above is a valved outlet, which could be used to drain the majority of the system if things go very wrong.  The valves will allow me to disassemble whatever portions of the system I like - within reason - without having to move the fish and drain the fish tank.  Where pressure should not be a significant issue, I will probably use unglued slip joints, as is the common tendency (this allows easy cleaning of the smaller pipes, as they can be disassembled).
  • I have tried to design the plumbing such that if there is a pump failure, the entire tank doesn't drain to the sump.  The system is configured such that the water in the fish tank must rise sufficiently to spill over into the grow bed flood plumbing.  The spillover tube is open at the top (the blue vertical tube in the illustration above), so that no siphon can form.
  • Finally, with the size of the tank, grow beds and plumbing, it should be very easy to expand this system by adding upwards of 6 more grow beds, without changing out the tank.  Additional sump will be required, if/when we get there.

Related Topics and Research

In doing my extended research, I investigated the keeping of koi.  These fish have rather particular water clarity needs, and so I felt they would make a good study in just how clean one could keep a pond or tank, and in what methods would serve to best achieve this.  Some of the interesting tidbits I collected from the koi pond building guides were:
  • Large plumbing is essential.  Under-sizing leads to clogging, mainly due to the typically low flow rates.
  • In koi ponds, once practice is to feed into swirl filters first, then get to media filters - if you're interested in removing the maximum amount of contaminants and not growing plants with them, that is.  Multiple swirl filters can be attached in series.
  • Bottom drains work best, as they encourage the capture of just about everything that falls to the bottom (thus my choice in a cone-bottom tank).  These are usually built into the koi ponds during construction.
  • Pipe purging can be done by creating a fast water flow.  In some koi ponds, this is done by disabling the filter feed pipe, draining the swirl filter, then enabling the filter feed pipe.  This (theoretically) allows water to flood in rapidly, dragging accumulated contaminates through the pipe and into the filter.  I should be able to do the same with my valve system.
  • Ideally, the pump should be places after the filtration assembly.  This improves pump life and reduces clogging at the pump.
  • Any inline heaters, UV lights, anaerobic filtration equipment, water polishing, and such, tend to go after the filters, and either before or after the pump.
While some of these points will not be highly applicable to aquaponics, I think some practices may prove beneficial.  In a future iteration I would like to employ some swirl filters to clean the water in prep for delivery to a NFT or DWC array.

Lighting

One of the unfortunate side-effects of using the porch is the lack of direct sunlight.  There is plenty of diffuse lighting, but I do not believe that will be sufficient for even my trial plants.  I have been investigating various lighting options.  Here's what I've considered:
  • HIDs - low entry cost but high energy usage and possibly short lifespan of bulbs.  
    • Metal Halide - bluish light that is good for vigorous plant growth.
    • High Pressure Sodium - reddish light that is good for fruiting.
    • It is ideal to use both kinds for the different stages of plant growth, but this requires a ballast that can energize both kinds of bulbs (or more than one ballast).
  • T5 fluorescents - moderate investment, lower energy usage than HIDs.  
    • Bulbs reportedly need to be replaced after 6 months.
  • LED - higher initial cost, lowest energy usage.
    • Research is comparatively scanty on LEDs for plants, but there is a growing industry and community.
    • DIY LED lights are possible.
My ideal lighting solution will probably be LED, and by that I plan to manufacture my own grow-lights.  There are several how-tos and at least one excellently engineered build-guide.  WHen compared to the buy-and-install of HIDs and fluorescents, LED lighting construction is not trivial.
  • Power Supply
    • An LED driver is required.  You can get LED drivers and drive them with D/C power, or purchase an all-in-one driver unit.
  • LED Assembly
    • Some people use red/blue diodes, others use white.  
    • Power LED lights require heat dissipation measures - a heat-sink or metal backing plate.
  • Cooling
    • Passive cooling is obvious and easy.
    • Active cooling requires power; the LED power source might provide for this, otherwise separate power requirements must be met.

Aeration

To assist with aeration, I plan on eventually having two systems in place:
  • Venturi aerator - this will be driven off the return water feed, so pump-powered and run directly back into the fish tank.
  • Air-stone pump - ideally with a backup power supply, this could run air in both the fish tank and the sump.
There are several online examples of DIY venturi aerators.  The construction is extremely simple, so I will be experimenting with that as well.

Project Road Map

I will be performing the testing and evaluation step first.  All other steps will occur as time and materials become available, so the order of events will not necessarily be as listed.
  • Build, test, and evaluate critical system components:
    • Siphon construction
    • Venturi aerator construction
    • LED lighting
  • Install the electrical
  • Build the grow-bed support frame
  • Acquire:
    • Fish tank
    • Grow beds
    • Sump
    • Miscellaneous system components
  • Plumb the system
  • Build the full lighting fixtures
  • Grow Bed assemblies
    • Build, install, and test the siphons
    • Evaluate fill/drain times against estimates
  • Cycle the system
  • Acquire fish
  • Add plants
  • Grow!


2016-01-12

Siphon Physics - Bell Heights and Drain Lengths

I have done some work on the bell siphon, and determined some interesting things:

The height of the bell does NOT seem to matter for siphon start.

To test this, I used a bell that was literally twice the length of the original, so that there was a very large air-column present.  Not only did the siphon start on schedule, but it also burped just as the original bell had.  I'd like to see this happen with a transparent bell, so as to see where the water level sits during operation.

Note that a siphon can operate with a gap between the drain and the supply; this is a "drip siphon."  It may be likely that any sufficiently large bell will always contain residual air during operation.  Whether or not this impacts the drain rate has not yet been determined.

Drain length DOES determine siphon rate.

To test, I ran a cycle with a short drain, then lengthened the drain pipe significantly.  The drain was a straight drop, down to a couple of 90-degree bends for back-pressure.  I stopped filling the basin once the water started spilling over.  While I have yet to go back over the videos and time the actual drains, I believe the longer pipe does in fact contribute faster drain rate. 

UPDATE: I determined from watching my videos that the short drain test emptied in approximate 61 seconds, whereas the long drain test emptied in approximately 47 seconds.  I timed from when the water started spilling over to when the bell finally burped.  According to calculations, the best possible increase in drain rate should have resulted in a 20-second decrease in drain time; I achieved 14 seconds decrease in drain time.  
I suspect the other 6 seconds may be due to lack of sufficient intake (I have perhaps 0.9 square inches of intake area available, turbulence notwithstanding), coupled with flow restrictions from the double-90's, and the reduced flow area inside the bell where the reducer is located.  Also, the imperfect seal between the bell tube and dome allows for air to intrude, and may be weakening the siphon rate.  A more careful examination of these variables will be required.

The math backs this up: according to Bernoulli's equations, the length of the drain pipe alone determines the siphon rate - up to the maximum possible rate, which is determined by another portion of the siphon and associated pressures and densities.  As such, doubling the drain's length will increase the siphon rate by a factor of roughly 1.4.  Example:  A 5" long drain on a siphon made with 3/4" pipe will drain at 449 cm3/sec.  That siphon with a 10" drain will operate at 635 cm3/sec, other factors notwithstanding.

The lesson should be clear: maximize the length of your drain pipe.

Snorkel Test #1

I also built a basic snorkel and tested it.  One interesting thing to note: the water level in the snorkel never went higher than what I would suppose to be the level of the water in the siphon itself.  Once the snorkel finally received air, the water was sucked up into the top of the bell and the siphon was broken.

I assembled my snorkel from a 3" to 2" reducer, then a 2" to 1", which I further reduced to 1/2" and then made two 90-degree turns.  To this I screwed in a pipe barb and attached a piece of 1/4" vinyl tubing.  The tubing is not yet secured to the bell.  I am anxious to try the inverted cup method, and would like to see how it operates with the cup attached to the side of the siphon.  I would also be curious to see if 1/2" PVC could be used instead of the vinyl tubing.


2016-01-10

Research - Bell Siphons

I have begun experimenting with bell siphons.  The premise and examples of the bell siphon can be gathered from any number of sites and illustrations.  Here, I am going to be working through, in stream-of-consciousness, the basic functionality and problems of the bell siphon.

The basic construction is as follows:
  • Standpipe: the vertical portion of the siphon that extends from the base of the grow-bed to near the top of the bell.  The height of the standpipe dictates the highest point at which water will rise in the grow-bed.
  • Bell: A pipe enclosed at one end, open-end-down over the standpipe.  Holes or notches are cut near the bottom to allow water to flood into the bell.  The height of the notches dictates the lowest point water will drain to.  The bell is usually sized such that it is within 1/2" of the top of the standpipe.  Its diameter must be suitable to the standpipe construction.
  • Drain Pipe: The piping situated below the standpipe (and the grow-bed), which drains into either the fish tank or a sump, or in some cases other grow-beds.  Typical recommendations are for the drain pipe to contain at least two 90-degree angles, for back-pressure and outflow direction.
The "system" is the siphon and the container (grow-bed, tank, etc) it is situated in.  The system receives water at a fill rate that we will consider constant.  It drains at a rate determined by the size of the drain pipes.  The drain rate may, of course, be impacted by the size of the bell's intake holes, the size of the bell itself, the complexity of the drain plumbing, and other factors.  For sake of simplicity, we will assume the bell intakes are adequately sized to allow water through at a rate equal to or greater than the maximum flow rate of the drain pipes.


Let us consider system operation.  We'll consider four discrete phases:
  1. Filling
  2. Spillover
  3. Drain
  4. Siphon Break
Let's consider the four stages and discuss the potential problems in each.

Filling

The Filling stage is the simplest.  As long as there is no active siphon, this stage can proceed quite readily.  If the siphon-break from the previous iteration did not occur, then the filling stage generally cannot proceed.  More on that later.

It is recommended that the standpipe have an emergency drain hole, in case of pump failure.  The emergency drain hole is small, typically 1/8" in diameter.  This sizing is large enough to allow a reasonable rate of emergency drain, but small enough to not appreciably impact the fill rate.

This stage does not appear to have any other potential problems.

Spillover

The Spillover is the period between Filling and Drain.  Water has begun flooding into the standpipe, but the siphon has not yet started.

In some of my early testing, an insufficient fill rate would result in the siphon never starting.  I suspect a critical volume of water must accumulate in the standpipe or drain, in order to form the necessary suction.  Once suction is present, the air bubble at the top of the bell will be pulled down into the standpipe and proper siphoning action will commence.

Some outstanding questions:

  • Does the fill rate alone determine whether or not the siphon will start, or does the geometry of the grow-bed factor in?  The reason this may be a question is that the length and width of the grow-bed translate into a rate of ascension, measured in height, for the water.
  • What is the spillover rate, and can we calculate it based on the diameter of the standpipe?  If this rate can be calculated, it will quantify the spillover phase and we can ensure that the fill rate is sufficient.
Common solutions to the siphon-start problem:
  • Introduce back-pressure via one or more of the following:
    • Add 90-degree bends to the drain pipe - usually 2 are recommended.
    • Restrict the diameter of the standpipe near its base.
  • Flare the top of the standpipe, either by heating and shaping the PVC, or by adding a fitting such as a reducer coupling or union.
Those who introduce either a restriction of diameter into the standpipe, or flare the standpipe's top, both often hypothesize that this has the added benefit of introducing the Bernoulli Effect to the siphon.  Given the rates of flow and relative openness of the bell-and-standpipe assembly, this may or may not be true.  To be certain, using a sufficiently large reducer coupling seemed to benefit my test siphon, but more analysis is required before crediting the reducer exclusively.

I also started experimenting with a trap-style bend in the drain pipe.  I was not able to complete the trap, however, so water was left in the drain pipe after the siphon completed and air remained in the bell, causing the bell to float during refill.  It is likely that air was also being sucked in between the bell pipe and the cap, as I did not glue the pipe and cap together.  During one refill I was able to see air bubbles escaping from the bell.

Drain

Once draining has started, the two key factors are the fill rate and drain rate.  These two rates can be used calculate the time required to drain the system.  Effectively, it is the system working volume divided by the drain rate less the fill rate, or V / (D - F).  Mind your units.

Basic siphon physics (Bernoulli's equations) appear to adequately describe the bell siphon.  It is suggested that the length of the drain defines the siphon rate - the longer the drain, the faster the siphon.  I have yet to determine if this is actually the case for the bell siphon.  My calculations, nonetheless, appeared to predict the operation of the siphon.  I was able to determine the drain time to within 3 seconds of actual operation, and that error could be due to the fact that my timing and fill methods are very crude...as is my actual test apparatus.

More important than drain length appears to be pipe diameter.  For example, a 10 cm increase in pipe length adds - in my specific scenario - 126.7 cm3/sec of flow rate, whereas a 10cm increase in pipe diameter adds over 21,000 cm3/sec.  Of course, one would ideally not use a 10cm diameter pipe except in the most unique circumstances.

Siphon Break

At this final stage, the water level in the system has reached the top of the bell intakes, what we shall refer to as the low-mark, and air can now intrude into the bell.  Ideally, the air intake and fill rates are sufficiently balanced so as to break the siphon.  The remaining water in the bell and in the siphon discharge to the grow-bed and to the sump or fish tank, respectively, and the cycle continues.

This unfortunately appears to be fraught with problems, and there are a wide variety of solutions available.  Let us consider the problem in terms of stages:

  1. The water reaches the low-mark, and air begins entering the bell and siphon.
  2. The siphon action is perturbed, reducing the flow rate.
  3. The fill rate remains unchanged, thus with the reduced drain flow rate the water rises above the low-mark.
  4. The siphon recovers, and the level begins to drop.
  5. Repeat.
As you can see, we have the makings for a never-ending siphon.  Some solutions:
  • Reduce the fill rate - filling too fast means slow drains, and potentially unending siphoning.
  • Enlarge the drain pipe - basically the other component of the equation for the previous solution.
  • Add a "snorkel" - this is a vent pipe that defines the low-mark and injects air directly into the top of the bell.
  • Add a snorkel with an inverted bell - this appears to be an improvement or a fix to the snorkel method.
The first two solutions are obvious and can be observed in calculation, so we will omit discussion.  The third and fourth solutions deserve comment.

The basic snorkel potentially encounters the same problem as the unchanged bell: the water reaches the bottom of the snorkel, air invades the bell, the siphon is perturbed, the rate diminishes, the fill recovers the lost water, and the siphon recovers.  Some have tried to prevent this by cutting the snorkel end at an angle.

The fourth solution basically appears to provide some buffering between the time the water reaches the bottom of the snorkel, and the time at which the snorkel begins taking in air.  It also ensures that water from the grow-bed cannot enter the snorkel once the snorkel begins taking air.

This video demonstrates the action of the cup+snorkel bell siphon.  The author of the video also utilizes a trap in the drain plumbing.  The theory behind the trap is that it forces the water level inside the bell to remain lower than the water level outside the bell.  Once the water starts to flood the standpipe, the bell is quickly flooded thanks to the additional pressure.  For this to function, one expects that the bell does not float much.

Further Discussion and Future Testing

The snorkel+cup bell appears to be a very promising siphon-break mechanism.  The necessity of the trap is undetermined.  One criticism I can see for the trap is that it would make predicting the high-mark water level of the grow-bed difficult.

For siphon start, the trap may help.  Of course, so might the reducer fitting.  Using both is probably excessive.  I would be curious to examine the function of a loop in the drain plumbing.  In theory, the loop would capture and cause a stable column of water to exit the siphon drain, power-starting the siphon effectively.  The most ideal operation would have the loop completely empty once the siphon in the bell is broken - in effect, a double siphon.  This would perhaps eliminate the standing water in the trap, and the reducer on the standpipe.  Eliminating the reducer would equate to reducing the diameter of the bell, which becomes important when one considers that in addition to the bell you must add a media-guard to the whole setup, thus taking up more grow-bed space.

One alternative to the bell siphon is the "U" siphon, which is constructed as a single pipe with two 45-degree bends, and two 90-degree bends, for the standpipe.  The low-mark is determined by a piece of downward-facing pipe.  This pipe enters a 45, which then proceeds into the two 90s, which exits into the second 45 and into the drain pipe.  The drain pipe and entry pipe are therefore parallel, and the combination of the 45s and 90s make for a skewed upside-down U shape.  The function is the same as for the bell: water spills over the top of the U, and a siphon is formed.  I could foresee this alternative having similar problems with siphon start and stop, but fewer remedies as the space available for adding hoses and such is very limited.